How to Store Tulip Bulbs After They Bloom-6 Steps

How to Store Tulip Bulbs After They Bloom

How to Store Tulip Bulbs After They Bloom

6 Simple Steps for Successful Storage and Future Blooms

Tulip Life Cycle

Why Store Tulip Bulbs?

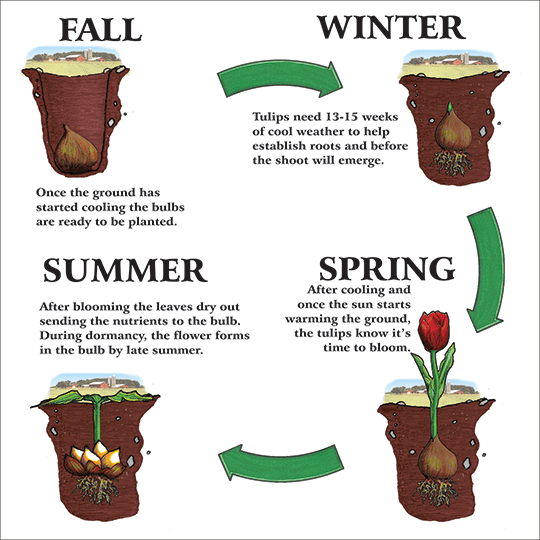
Properly storing tulip bulbs after they bloom gives them a better chance of flowering again next season. While tulips are perennials in the wild, garden conditions often aren’t ideal for them to return with the same vigor year after year without intervention.

Following these steps will help preserve your tulip bulbs and ensure beautiful blooms in the next growing season.

1
Cut the Blooms After Flowering

Once your tulip flowers have faded and died, use pruning shears to cut off just the flower heads. This prevents the plant from using energy to produce seeds.

Important: Leave the green leaves and stems intact! The foliage continues to photosynthesize and sends energy down to the bulb for next year’s growth.

Tip: Cut the stem as close to the base as possible, but be careful not to damage the leaves.

2
Wait for Leaves to Yellow and Die Back

Allow the foliage to naturally yellow and wither, which typically takes about 6 weeks after blooming. During this time, the leaves are sending vital nutrients back to the bulb for next year’s growth.

Once the leaves have completely yellowed and dried, it’s time to dig up the bulbs. Use a garden fork or shovel to carefully loosen the soil around the bulb cluster, being careful not to damage the bulbs.

Warning: Don’t overwater tulips during this die-back period. Occasional rain is fine, but too much moisture can cause the bulbs to rot.

3
Clean and Dry the Bulbs

After digging up the bulbs, gently shake off excess soil. Remove any remaining leaves, roots, and loose outer layers (called tunics) that appear dead or damaged. Use pruning shears for larger roots and stems.

Place the cleaned bulbs on a tray in a single layer. Allow them to dry in a cool, well-ventilated location out of direct sunlight for about 1-2 days.

Tip: Do not wash the bulbs with water as this can introduce moisture that promotes fungal growth and rot.

4
Sort and Inspect the Bulbs

Carefully examine each bulb for signs of disease, damage, or rot. Healthy tulip bulbs should feel firm and solid, with no soft spots or visible mold.

Discard any bulbs that are:

  • Soft or mushy to the touch
  • Showing signs of mold or fungus
  • Severely damaged or split
  • Unusually lightweight or hollow-feeling

If you find bulbs with only minor damage or small spots of rot, you can try to save them by cutting away the affected areas with a clean, sharp knife disinfected with rubbing alcohol.

Tip: Separate the small bulblets (offsets) from the parent bulbs. These can be planted separately but may take 1-2 years before they’re large enough to flower.

5
Store Bulbs Properly

Choose one of these methods to store your tulip bulbs:

  • Mesh Bags: Place bulbs in mesh bags (like old onion bags) that allow air circulation.
  • Paper Bags: Use paper bags with air holes punched in them.
  • Cardboard Box: Arrange bulbs in a single layer in a cardboard box with ventilation holes, separating them with dry peat moss, vermiculite, or sawdust.

Store in a cool (40-50°F/4-10°C), dry, dark place such as:

  • A basement or cellar
  • A garage (as long as temperatures don’t drop below freezing)
  • The vegetable crisper drawer of your refrigerator (if you live in a warm climate)

Warning: If storing in a refrigerator, keep bulbs away from fruits and vegetables that release ethylene gas (like apples), which can kill the flower embryo inside the bulb.

Tip: Check your stored bulbs every 2-3 weeks for signs of mold or rot. Remove any affected bulbs immediately to prevent spread to healthy ones.

6
Replant at the Right Time

Tulip bulbs can be stored for up to 12 months when kept in proper conditions, but they should ideally be replanted at the appropriate time for your climate:

  • Fall Planting: If you’re in zones 3-7, plant tulip bulbs in the fall (September to November), 6-8 weeks before the first hard frost.
  • Winter Planting: If you’re in zones 8-10, chill the bulbs in the refrigerator for 8-10 weeks before planting in late December or January.

Plant tulip bulbs 6-8 inches deep (larger bulbs deeper, smaller ones more shallow) and 4-6 inches apart, with the pointed end facing up.

Tip: Add bulb fertilizer or bone meal to the planting hole to provide nutrients for spring growth. Water well after planting, but avoid overwatering during dormancy.

Additional Tips for Success

  • Label Everything: Add labels to your storage containers indicating tulip variety and color to avoid confusion at planting time.
  • Consider Your Climate: In very mild climates (zones 8-10), tulips may need artificial chilling in the refrigerator for 8-10 weeks before planting.
  • Perennial Varieties: Some tulip varieties are more likely to return year after year. Species tulips, Darwin hybrids, and Emperor tulips are more perennial than others.
  • Container Tulips: Tulips grown in containers are less likely to perform well in subsequent years. Consider these as annuals or give them extra care.
  • Pest Protection: Add some mothballs or a sachet of dried lavender to your storage container to deter pests like mice that might be attracted to the bulbs.

Tulips are among the most beloved spring-blooming flowers, providing vibrant colors and beautiful displays in gardens worldwide. However, after they bloom, tulip bulbs require proper care and storage to ensure they bloom again the following season. If you want to preserve and reuse your tulip bulbs, understanding the correct methods of post-bloom care, drying, and storage is crucial. This guide will cover everything you need to know about How to Store Tulip Bulbs After They Bloom, ensuring healthy flowers year after year. Let’s begin…

Botanical Name-Tulipa spp.

Family– Liliaceae

Genus-Tulipa

Common Name– Tulip

Plant Type– Perennial bulb

Plant Size– Typically 6-24 inches (15-60 cm) tall, depending on the variety

Blooming Season-Spring (March to May, depending on the climate and variety)

Flower– Cup-shaped, star-like, or fringed flowers in various colors, including red, yellow, pink, purple, orange, and white. Some varieties have bi-color or patterned petals.

Preferred Soil-Well-draining, sandy or loamy soil with a neutral to slightly acidic pH (6.0-7.0)

Sunlight Requirements-Full sun to partial shade

Water Needs-Moderate, with good drainage to prevent rot

Why Store Tulip Bulbs?

Tulip bulbs can be left in the ground in some climates, but lifting and storing them has several advantages:

  1. Prevents rot in areas with wet summers.
  • Protects bulbs from rodents and pests.
  • Allows for better spacing and garden planning.
  • Encourages stronger and healthier blooms for the next season.
  • Enables replanting in different garden designs or containers.

Step-1. Allow the Foliage to Die Naturally

After tulips finish blooming, resist the urge to cut back the leaves immediately. The foliage is essential for photosynthesis, helping the bulb absorb nutrients and store energy for the next growing season. Here’s what you should do:

  • Leave the leaves intact for at least 6-8 weeks after blooming.
  • Avoid tying or braiding the leaves, as this can hinder the absorption of sunlight.
  • Water the plants regularly but reduce watering gradually as the leaves start to yellow and die back naturally.

Step 2. Digging Up the Bulbs

Once the foliage turns completely yellow and withers, it is time to lift the bulbs from the ground.

  • Use a garden fork or spade to carefully loosen the soil around the bulbs.
  • Gently lift the bulbs without damaging them.
  • Shake off excess soil but avoid washing them with water, as moisture can lead to rot.

Step 3. Cleaning and Drying the Bulbs

Proper drying is essential to prevent fungal growth and decay.

  • Place the bulbs in a dry, well-ventilated area away from direct sunlight.
  • Allow them to dry for 1-2 weeks.
  • Once dry, remove any remaining soil and gently rub off any loose outer layers.
  • Trim any dead roots and discard any damaged or moldy bulbs.

Step 4. Curing the Bulbs

Curing is a crucial step to prepare tulip bulbs for storage.

  • Lay the bulbs in a single layer in a warm, dry place (60-70°F or 15-21°C) for another week.
  • Ensure good air circulation by keeping them in mesh trays or paper bags.
  • Avoid storing bulbs in plastic bags, as this can trap moisture and cause mold.

Step 5. Storing the Tulip Bulbs

To keep the bulbs in optimal condition until the next planting season, follow these storage guidelines:

  • Choose the Right Container-Use mesh bags, paper bags, or cardboard boxes lined with newspaper to promote airflow.
  • Maintain Proper Temperature– Store bulbs in a cool, dry, and dark place with temperatures between 35-50°F (2-10°C), such as a basement, garage, or refrigerator.
  • Check for Moisture and Pests-Periodically inspect stored bulbs for signs of mold, rot, or pest infestations. Remove any affected bulbs immediately.
  • Keep Away from Fruits-Avoid storing bulbs near fruits like apples and pears, as they release ethylene gas, which can damage bulbs.
  • Use Fungicide (Optional)- To prevent fungal infections, dust bulbs with a fungicide before storage.

Step -6. Preparing for Replanting

Stored tulip bulbs should be planted in the fall (September to November) before the first frost.

  • Inspect bulbs before planting to ensure they are firm and healthy.
  • Choose a well-draining location with full sun exposure.
  • Plant bulbs at a depth three times their height, usually 6-8 inches deep.
  • Space bulbs 4-6 inches apart and water them thoroughly after planting.
  • Apply a layer of mulch to help retain moisture and regulate temperature.
  • Fertilize with a low-nitrogen bulb fertilizer to encourage strong root growth.

Common Mistakes to Avoid

  • Cutting foliage too early- This deprives bulbs of essential nutrients.
  • Storing in plastic bags-This traps moisture, leading to mold and decay.
  • Leaving bulbs in wet conditions-This increases the risk of rot.
  • Neglecting to check stored bulbs-Regular inspections help prevent issues before they spread.
  • Not labeling bulbs– Different tulip varieties can look similar when stored, so labeling them prevents confusion.
  • Storing in high humidity-Moist conditions encourage mold growth, making bulbs unusable.

Bonus Tips for Healthy Tulips

  • Rotate planting locations=Avoid planting tulips in the same spot every year to prevent soil depletion and disease buildup.
  • Companion planting-Consider growing tulips alongside daffodils, which deter rodents that may eat tulip bulbs.
  • Pest prevention-Use wire mesh or plant bulbs in buried containers to protect them from burrowing animals.
  • Water properly-Tulips need moisture but should not sit in waterlogged soil. Ensure proper drainage to prevent bulb rot.

Storing tulip bulbs after they bloom is an excellent way to enjoy their beauty year after year. By following these steps—allowing foliage to die back, properly drying and curing bulbs, and storing them in a cool, dry place—you can ensure healthy tulips for the next growing season. With the right care, your tulip bulbs will continue to produce stunning flowers, enhancing your garden’s charm every spring.

By taking the time to store and care for tulip bulbs correctly, you not only save money but also help maintain a vibrant, colorful garden that returns with beauty each year. Happy Gardening…

Leave a Comment