How to Propagate a Swiss Cheese Plant
3 Different Ways to Multiply Your Monstera Adansonii
:max_bytes(150000):strip_icc()/GettyImages-14135309071-5ba676c4b4f24a36aaf2215d825bf352.jpg)
The Swiss Cheese Plant (Monstera adansonii) is a beautiful, fenestrated houseplant that’s becoming increasingly popular among plant enthusiasts. Propagation is a great way to grow your collection or share with friends without purchasing new plants.
Before You Begin: Essential Tools
- Sharp, clean scissors or pruning shears
- Clean jars or containers (for water propagation)
- Well-draining potting soil
- Small pots with drainage holes
- Sphagnum moss (for air layering)
- Plastic wrap or bags
- Rooting hormone (optional)
- Twine or plant ties
To successfully propagate a Swiss Cheese Plant, you need a cutting with at least one node – the small bumpy area on the stem where leaves grow from. Nodes are essential as they contain the cells needed to develop new roots.
Method 1: Water Propagation
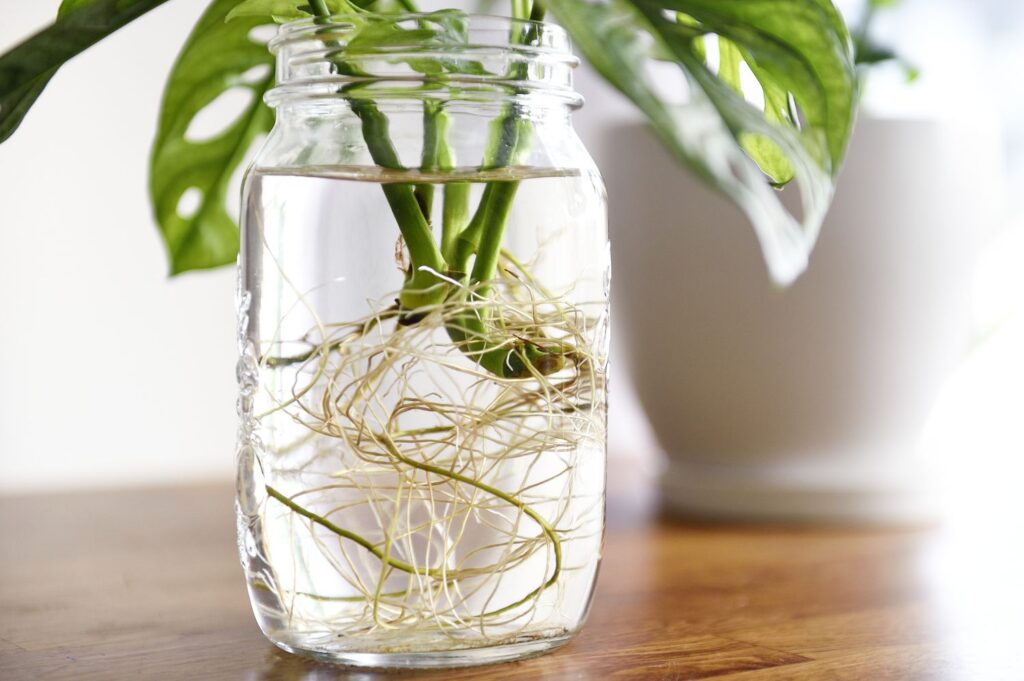
Easiest MethodThis method lets you watch the roots develop in water before transferring to soil.

Monstera adansonii cutting developing roots in water
Take a Stem Cutting
Cut the stem just below a healthy leaf node using clean, sharp scissors. Make sure there is at least one leaf attached to the cutting. If there are multiple leaves, you can remove the lowest one to give more room in the water.
Place in Water
Put the cut end of the stem in a clear glass container filled with room temperature water. Make sure the node is submerged but try to keep most leaves above the water.
Find a Good Location
Place the container in a spot with bright, indirect light. Avoid direct sunlight as it can overheat the water and cutting.
Change Water Regularly
Replace the water every few days to prevent bacteria growth. You should start to see roots forming within 2 weeks.
Transfer to Soil
Once the roots are about 2 inches long (usually takes about 2 months), the cutting is ready to be planted in soil. Plant in a well-draining potting mix in a small pot with drainage holes.
Care After Planting
Keep the soil consistently moist (but not soggy) for the first week as the plant adjusts to its new environment. Then transition to regular care.
Success Tip:
If using tap water, let it sit out for 24 hours before using to allow chlorine to dissipate. Room temperature water works best for root development.
Method 2: Soil Propagation
Faster EstablishmentPlanting cuttings directly in soil can lead to faster establishment once roots develop.
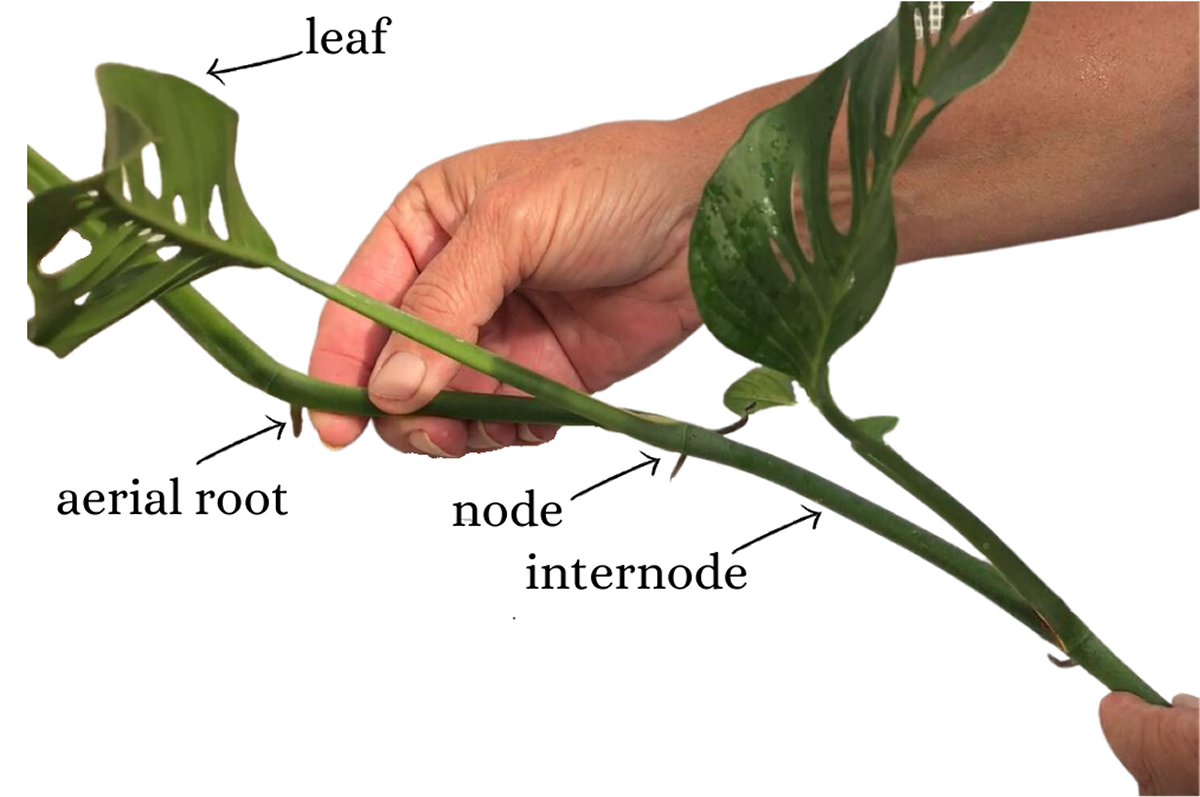
Diagram showing the key parts of a Monstera adansonii for propagation
Prepare the Potting Mix
Create a well-draining mix by combining standard potting soil with perlite, orchid bark, or rice hulls to improve aeration. Moisten the soil before planting.
Take a Stem Cutting
Cut a section of stem with at least one node and leaf, making the cut just below the node. Use clean, sharp scissors or pruning shears to make a clean cut.
Apply Rooting Hormone (Optional)
Dip the cut end into rooting hormone powder to stimulate faster root development. This step is optional but can improve success rates.
Plant the Cutting
Make a hole in the moist soil and insert your cutting so the node is buried about 1-2 inches deep. Gently press the soil around the stem to stabilize it.
Create Humidity
Cover the pot with a clear plastic bag to create a mini greenhouse effect, which helps maintain humidity. Remove occasionally to prevent excess moisture.
Provide Proper Care
Place in bright, indirect light and keep the soil consistently moist but not waterlogged. After about 4-5 weeks, you can test for roots by gently tugging on the cutting – resistance means roots have formed.
Success Tip:
Using a small pot (4 inches) allows the soil to dry slightly between waterings, which helps prevent root rot. You can tell the cutting has rooted when you see new leaf growth emerging.
Method 3: Air Layering
Lowest Risk MethodThis method allows roots to form while the cutting is still attached to the parent plant, increasing success rates.

Air layering process on a Monstera plant
Identify a Suitable Node
Select a healthy stem with at least one leaf node. The stem should be firm and mature enough to support new growth.
Make a Small Cut
Using a clean knife, make a small perpendicular notch about 1/8 inch deep just above the node. This encourages root development at that point.
Apply Sphagnum Moss
Moisten a handful of sphagnum moss with water (it should be damp but not dripping). Wrap it around the cut area and the node.
Secure with Plastic
Wrap the moss ball with plastic wrap or place it in a small clear plastic bag. Secure it gently with twine at both ends, leaving the top slightly open for air circulation.
Maintain Moisture
Check the moss every few days and mist with water if it begins to dry out. The moss should remain consistently moist throughout the process.
Monitor Root Development
After about 1-3 months, you should see roots forming within the moss wrap. When the roots are approximately 2 inches long, cut the stem below the rooted section.
Plant the New Cutting
Remove the plastic and moss carefully to avoid damaging the new roots. Plant the rooted cutting in a pot with well-draining soil and water thoroughly.
Success Tip:
Air layering has the highest success rate because the cutting continues to receive nutrients from the parent plant while developing its own root system. This method is ideal for valuable or rare varieties.
Method Comparison
| Method | Difficulty | Time to Roots | Success Rate | Best For |
|---|---|---|---|---|
| Water Propagation | Easy | 2-3 weeks for initial roots 2 months until ready for soil |
High | Beginners, watching root development |
| Soil Propagation | Medium | 4-5 weeks | Medium | Faster establishment, avoiding transplant shock |
| Air Layering | Advanced | 1-3 months | Very High | Valuable plants, guaranteed success, larger cuttings |
Aftercare Tips for Your New Plants
How to Care for Your Propagated Swiss Cheese Plants
Light Requirements
Place your new plants in bright, indirect light. Avoid direct sunlight, which can burn the delicate leaves. An east or north-facing window is ideal.
Watering Schedule
Water when the top inch of soil feels dry. Newly propagated plants may need slightly more frequent watering as their root systems establish.
Humidity Needs
Swiss Cheese Plants prefer higher humidity (50-60%). Consider using a humidifier or placing the pot on a pebble tray with water to increase moisture around the plant.
Fertilization
Begin fertilizing with a balanced houseplant fertilizer diluted to half strength about 4-6 weeks after propagation, during the growing season (spring and summer).
Troubleshooting Common Issues
- Yellowing leaves: Usually indicates overwatering. Let the soil dry out more between waterings.
- Brown leaf edges: Often a sign of low humidity or underwatering.
- No new growth: Be patient! New growth may take several weeks to appear after propagation.
- Leggy growth: The plant needs more light. Move it to a brighter location (still avoiding direct sun).
Ready to Grow Your Plant Family?
Propagating your Swiss Cheese Plant is a rewarding way to expand your collection and share with friends. Each method has its advantages, so choose the one that works best for your skill level and patience. With proper care, your new plants will thrive and bring years of enjoyment!